Last Updated
March 13, 2023
How to Record a Zoom Webinar as Host or Participant

.webp)
Are you looking for a simple, easy way to capture content and keep a digital record of your next Zoom event? Getting started can be simple!
Recording a Zoom webinar is easy when you have the right tools to help you. With user-friendly software solutions and basic technical knowledge, you can capture high-quality audio and video to suit any content plan! This is a great way to turn your webinar content into the first step of a greater marketing strategy.
Whether you’re a Zoom webinar host or just a participant, we’ve got you covered. Here’s what you need to know so that you can record your webinar with ease.
What is a Zoom webinar?
You might be familiar with the Zoom meeting format, but do you know what Zoom webinars are and how they work?
Unlike Zoom meetings, which are restricted to a small number of attendees, Zoom webinars are designed for broadcasting to the masses. With a webinar, you can start with 500 participants, scaling up to as many as 50,000 view-only attendees. This is a great way to reach more people than ever before and grow your business using meaningful, engaging content.
The mass communication potential provided by Zoom webinars opens up plenty of content opportunities. You can use the webinar format to connect with a large audience, hosting events and educational seminars that relate to your brand or niche. Over time, you’ll establish more credibility, and you could become a leader in your industry.
Zoom webinar vs. meeting
While Zoom meetings tend to focus on one-to-one or small group conversations, Zoom webinars are much broader.
Webinars allow you to produce large-scale interactive events that your audience can attend in real-time, even if they can’t contribute to the conversation directly (in larger webinars).
When you record webinar content, you can get even more value out of your work, sharing it on social media and other platforms so that people who couldn’t attend live can still be a part of your journey.
There are so many ways you can leverage a Zoom webinar for success!
Can I record a Zoom webinar?
Recording a Zoom webinar is easy! You can choose between Zoom’s in-built recording tools or an external software system.
Different recording options will offer different features and benefits. It’s important that you consider your unique needs and content goals so that you can select the best recording pathway and capture outstanding content.
Why should you record a Zoom webinar?
There are many reasons why you might choose to record a Zoom webinar!
You might want to create a recording that you can use to draw inspiration from and inform future webinars you plan to host on behalf of your brand.
Webinar recordings can also be used as a valuable marketing tool. You can share your webinar content online and reach new people who did not attend live on Zoom. This might even help you advertise your next webinar event or a business offering!
Recorded webinar content can be an asset in your overall content strategy, so never miss a chance to produce professional content that effectively represents your brand and its products or services. You can even repurpose your content, using transcripts to produce blog posts or creating short, shareable clips of your webinar for social media posts.
Requirements for recording Zoom webinars
If you plan to record your webinar on Zoom, there are very few prerequisites you need to meet, especially if you are the host of the online event.
Generally speaking, you’ll need a paid Zoom subscription with cloud recording enabled. Depending on the size of your webinar, you may need to purchase a Zoom subscription. Otherwise, you’re ready to get started. Simple!
Setting up a Zoom webinar recording
Before your webinar begins, it’s a good idea to double-check your Zoom recording settings and functionality. This way, you can approach your webinar with confidence and avoid mishaps that could cause your recording to miss important content segments.
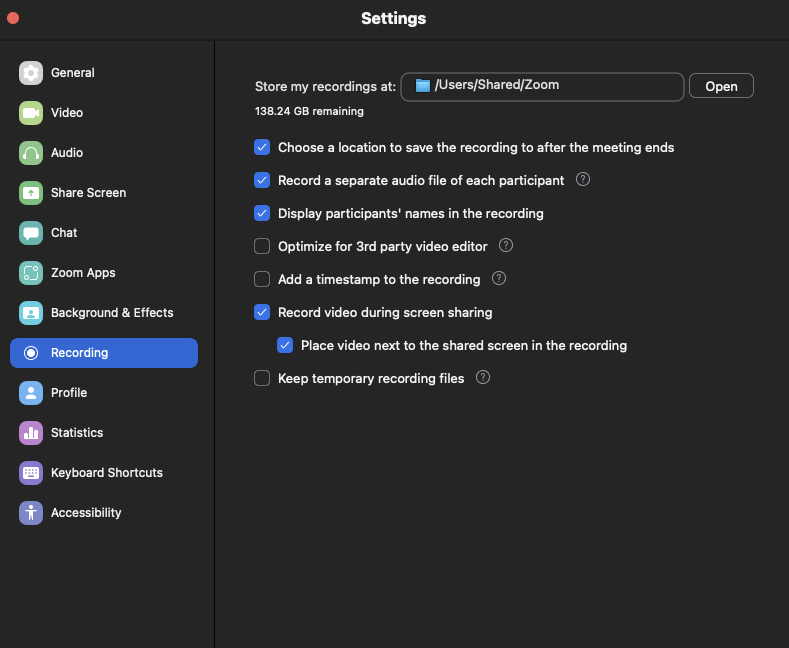
Prior to your scheduled webinar, open your Zoom account, and navigate to settings. Here, ensure that cloud recording is fully enabled and unrestricted.
Save these settings, and consider running a test recording to make sure everything you need is in working order before your webinar is scheduled to start. Extra time for troubleshooting could save you from stress in the long run.
How to record a Zoom webinar as a host
Recording a Zoom webinar as a host is easy! Follow these simple steps.
Step 1: Log in to your Zoom account. If you'd like recordings to store online, go to your 'Settings', check that Cloud Recording is enabled. Alternatively, choose a location to save your recordings locally on your computer.
Step 2: Set up and start your Zoom webinar.
Step 3: Start recording by pressing the Recording icon at the bottom of your Zoom window.

Step 4: Choose whether you want to 'Record on this computer' or 'Record to the cloud'.
Step 5: Use the pause, stop, and start buttons to pause, stop, or resume recording.
Step 6: When your webinar is over, Stop recording, and ensure that recording files are saved to your device or to the cloud.
Step 7: If you’ve recorded to the cloud, navigate to the 'Recordings' menu in your Zoom web portal, and download your files.
If you’ve recorded locally to your computer, you can find them by default in your Zoom folder. Alternatively, before recording you can set up a specific destination to save recordings to on your computer.
Step 8: Share your recording to social media, your email list, or another platform.
How to record a Zoom webinar as a participant
While you can’t use Zoom’s in-built recording tools as a webinar participant, there are other options you can turn to. Follow these simple steps.
Step 1: Log in to your Zoom account at the time of the scheduled webinar.
Step 2: Enter the webinar, ideally arriving early to allow time to set up recording.
Step 3: Navigate to your device’s in-built screenshot or screen capture tools, such as Quicktime for Mac or Game Bar for Windows.
Step 4: Set up a screen recording and make sure your software is ready to record the audio and screen of your Zoom window.
Note that this process may differ depending on your software or the device you’re using. You can check out our blog on screen recording to find out more.
Step 5: Use the options or preferences menu to select desktop as the destination for your completed recordings.
Step 6: Start recording the webinar. When the event ends, stop recording, and check that all files are saved correctly.
Bonus: How to pre-record a zoom webinar
While Zoom doesn’t have a built-in feature for pre-recorded webinars, you can work your way around this using the screenshare feature. Note that you’ll need the Zoom webinar add on and that this doesn’t offer optimal quality.
When pre-recording a webinar, you record content as you usually would on Zoom. Then to air your recorded session, follow these simple steps.
Step 1: Login to Zoom and setup and start your webinar
Step 2: When you are ready to share your pre-recording, click 'Share Screen’.
Step 3: Select the 'Advanced' tab then 'Video' and choose the recording you’d like to share. Click ‘Open’ and your video should appear on screen for all participants in the webinar.
Step 4: Once you’ve tested and setup your recording, allow your participants to join your recording and play the video when you’re ready to start.
Step 5: Stop the video when you’re done and end the webinar as you wish.
While this workaround works well, we suggest trying more dedicated pre-recorded webinar software.
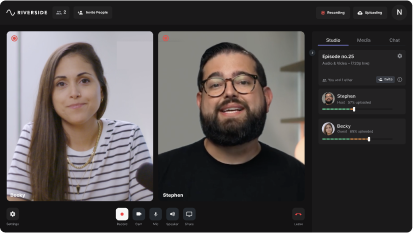
The best alternative for recording webinars in HD: Riverside

While Zoom can be a good native recording option, it does have some limitations. If you want to produce better-quality webinar recordings, you may prefer to use an alternative software tool, like Riverside.
Key features include:
- Local recording to ensure no internet issues ruin your recording quality.
- Separate track recordings for more controlled editing
- Recordings with up to 8 participants and 1000 audience members
- Live audience call ins to improve audience engagement
- High-resolution recordings at up to 4K video and up to 48kHz audio resolution
- Producer mode so you can get a behind-the-scenes assistant without worrying about recording them
- Multistreaming to platforms such as YouTube, Twitter and any custom RTMP
- Live Media Board to spice up your webinar with sound effects and more
- Automatic transcriptions and clip creation tools for easy content repurposing
- Editor for quick custom branding
- Collaborative workspace for a seamless workflow on our Business Plans
If you’re planning to include your webinar content in your future digital communications or incorporate it as part of your marketing strategy, Riverside can help! With advanced tailor-made recording technology, you can enhance your quality and maximize your professionalism.

FAQs on how to record a Zoom webinar
Are you still unsure of how best to record your next Zoom webinar? Here are our answers to a few of our most frequently asked questions.
Can you record a Zoom webinar if you are not the host?
Unfortunately, Zoom does not allow webinar participants to record meetings directly within the platform without host permissions. However, this doesn’t mean that you can’t capture webinar content when you need to! Ensure that you have the host’s permission to record, then use either your device’s in-built screen recording tool or an app-based screen recording software program to record.
Is it possible to record a Zoom webinar?
It is both possible and easy to record a Zoom webinar! You can use Zoom’s in-built recording features to get started. Alternatively, you can use an external recording software solution to help you.
How do I record a Zoom webinar without permission?
As a Zoom webinar participant, you can record a webinar without hosting permissions by using an external recording tool, either on your device or via another application. However, for legal reasons, it is always best to get permission before you record someone else’s content. This can ensure that you’re doing the right thing by the webinar host, as well as helping you avoid copyright or confidentiality issues.
Can you screen-record a Zoom webinar?
You can screen record a Zoom webinar using your computer’s built-in screen recording tool, or you can download a screen recording app to use. Once you’ve selected your software solution, follow the prompts to get started with your recording.
Where is Zoom webinar recording?
Your Zoom webinar recording may save to the cloud or to your device, depending on your account settings and recording preferences. Look for your recording where your settings have instructed it to save, and then save your final recording file where it is easily accessible.
Are you interested in trying Riverside to produce studio-quality recordings of your webinars and online events? Create a Riverside account now, and get started for free!


 (1).webp)
.webp)
.webp)