Last Updated
August 7, 2023
How to Trim a Video Easily (Mac, Windows & Mobile Devices)

.webp)
Whether you’re building up your YouTube channel with Shorts, creating a TikTok, or editing corporate videos, there are several reasons why you may want to trim a video.
In this article, we’ll look at how to trim a video on Windows and Mac computers, plus Android and iOS devices. We also recommend some of the best software for trimming videos.
What is the easiest way to trim a video?
An effective online video trimmer is the easiest way to cut a video. You can find trimmer software that’s purely for trimming videos, or you can use a full-suite editor. Some recording and social media video platforms have built-in trimming, so it’s also worth looking for this.
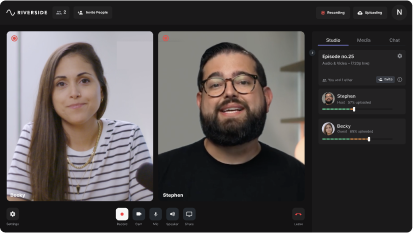
For example, Riverside’s new text-based editor makes video trimming as easy as reading through a transcript. We use AI-powered technology which can automatically transcribe recordings in over 100 languages.
Editing and trimming parts of your video is as simple as deleting the text in the transcription, which then cuts the tape. You can also search the transcription for a word or phrase to find it in the video instantly.
How to trim a video on a Windows PC with the Photos App
It’s quite simple to trim a video on a Windows PC computer with the built-in Photos app.
Step 1: From your desktop, click menu and then open the Photos app
Step 2: Click on the video that you want to edit to open it.
Step 3: Select the ‘Edit & Create’ button with the scissors icon in the top right corner. Then click on the drop-down selection of ‘Trim’.
Step 4: At this point, you’ll see white pins on the right and left sides of your video’s timeline. Drag these pins to where you want the footage to start and end. Use the blue pin to play through the footage to ensure you’re trimming the correct session.
Step 5: To trim the file, click the ‘Save a copy’ button in the top-right corner. Windows will still save your original file without the edits.
How to trim a video on a Mac or iOS device with iMovie
iMovie comes pre-installed on MacOS computers and most iOS devices and is an easy-to-use software for trimming video.
To cut a video in iMovie on Mac follow the below steps:
Step 1: Open the iMovie app on your macOS computer.
Step 2: Click ‘File’ then ‘Import Media’ to upload the video you’d like to trim or just drag and drop it into the editing panel.
Step 3: The timeline of your video will show up in the editing panel. You can use the white vertical line to scrub through the video and find the points you want to edit. Press your Space bar to start and stop playback.
Step 4: To make the video shorter, you can drag the beginning and end of the timeline. Alternatively if you’d like to trim out a part in the middle of the video, place the white line at that point. Either click the ‘scissors’ icon in the bottom left corner of the viewer or press the Command(⌘)+B keys to split the video into two parts.
Step 5: Select the part of the video that you want to remove and press the Delete key.
Step 6: Press the Space bar to review the trimmed video and save it if you’re happy with the edit.
To trim your video in iMovie on an iPhone or iPad you can follow the below steps:
Step 1: Open the iMovie app of your iOS device.
Step 2: You’ll see ‘Start New Project’; select the ‘Movie’ option. Choose from your camera roll the video you want to edit and upload it to the app.
Step 3: Your video will appear in the timeline in iMovie. Tap the timeline, and you’ll see sliders on both ends of your video. Drag the sliders to the area of the video that you want to keep. Then click Done to finish trimming.
Step 4: Preview your new video and decide whether to save or keep editing. Choose the share button to send the video to others.
How to trim a video on Android devices
The easiest way to trim a video on Android devices is to use the pre-installed Gallery app.
Step 1: Open the Google Gallery app, which shows your photos and videos on your device.
Step 2: Click on the video that you want to shorten.
Step 3: Tap on the pen icon that says ‘Edit’ on the button of your screen.
Step 4: You’ll now see handles appear at the start and end of your video. Drag these handles to trim the video to the section you want.
Step 5: Press the play button in the middle of the video to review the footage you’ve clipped to ensure it’s what you want.
Step 6: Tap ‘Save copy’ on the top right to save your trimmed video. Your original video will still be on your device until you delete it.
How to trim a video easily online with Riverside
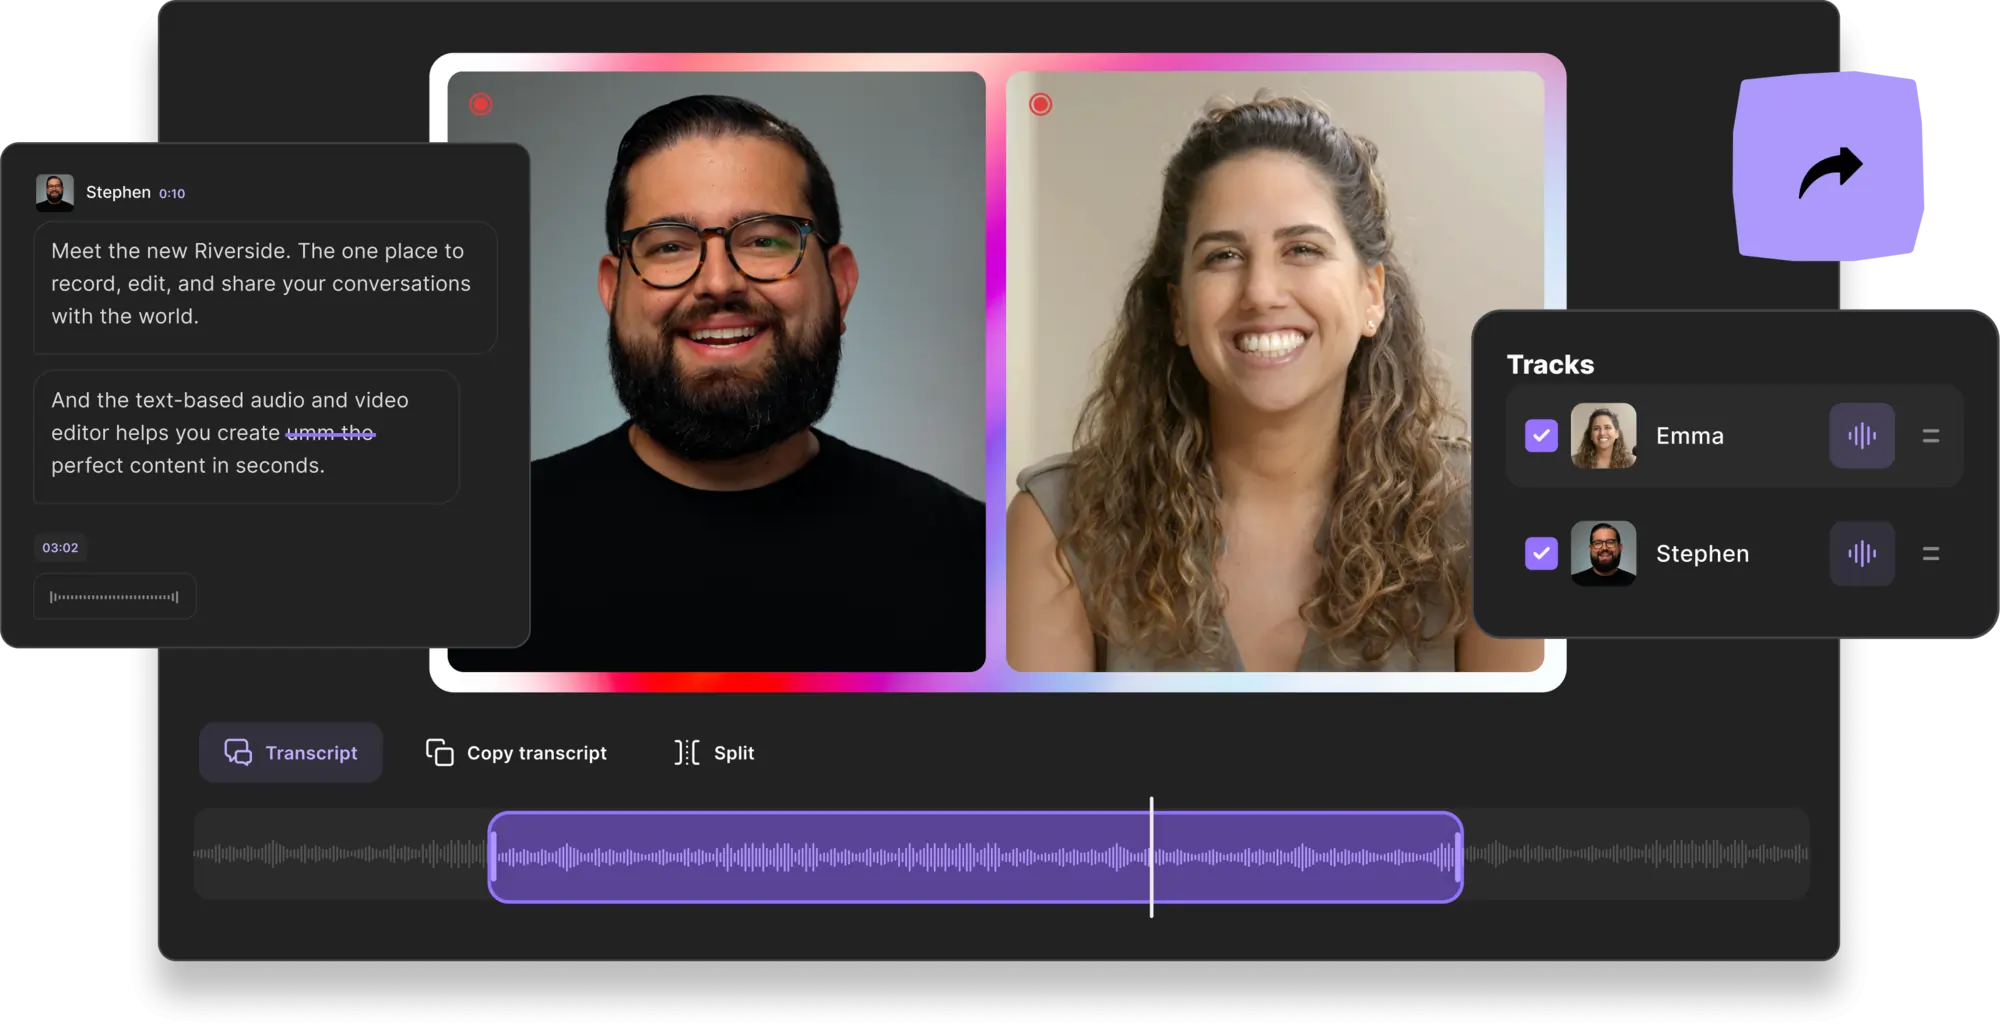
With Riverside's new text-based editor, trimming a video has never been easier. It’s as simple as reading through a text-document. You can get precise cuts, just by deleting text and you don’t have to rewatch long recordings to find the exact moment you’d like to trim.
Step 1: Log into your Riverside account at Riverside.fm or create a new free account.
Step 2: Click on your studio with the video you want to edit and then select ‘View recordings’. Choose the recording you’d like to trim.

Step 3: Once you’re in the recording, click the purple ‘Go to Editor’ button in the top right-hand corner. Choose a video layout; there are three options: story, post, and full length.
Step 4: Now, you’ll see the brand-new text-based Riverside editor. A transcription of the recording will appear to the left of the video capture. You can use this transcription to navigate and trim through the recording.
- To navigate simply place your cursor at the sentence or phrase you’re looking for and you’ll notice the timeline will also jump to this point in the video. You can also use the search bar to find a specific phrase.
- To delete text, select the portion of the text you’d like to cut out and you’ll see a ‘Remove’ button. Either push this button or the delete button on your timeline to remove that portion of the video. Click ‘Revert’ to undo any changes.
You can also edit your video using the timeline.
Click on a point in the timeline and click ‘Split’ to cut the timeline in two. Drag the beginning or end points to trim, or select a segment of the recording on the timeline and click the ‘Remove’ button.
Step 5: Now that you’ve made the desired edits, it’s time to export your video. When you export, the editor will not include greyed-out sections.
Click the purple ‘Export’ button in the top right-hand corner. You’ll see a few different settings for your export. You can choose to save your video in up to 4K resolution, as well as normalize audio levels, remove background noise, and remove watermark. Click ‘Export’ when you’ve made your selections.
Step 6: Next, you’ll receive a message that we’ll email you soon when your video is ready. Now you can download your trimmed video, or share it directly to Spotify and other channels.
Best software for trimming videos
While you can easily use built-in editing tools, you might want to consider an editor that offers more than just rimming. Here are some of our top reccomendations to trim your videos:
Riverside
Price: free with paid plans starting at $15 per month
Compatibility: available for macOS and Windows PCs, as well as iPhone and Androids
Trimming your videos with Riverside.fm is now as easy as editing a document. Our new text-based editor provides instant transcriptions in more than 100 languages. Deleting the text from your transcription cuts the corresponding part of the video, with all participants' audio and video tracks synched together.
These Ai transcriptions also make it easier to navigate through your transcript. You can use the search bar to find a specific phrase on your timeline,without having to rewatch multiple times, making editing much faster.
Even better, trim your long-form content into short-form videos effortlesy with Riverside’s Magic Clips tool. The tool uses Ai to identify highlights in your recordings and turns them into short shareable clips.
Features:
- Text-based audio and video editing so trimming content is quick and easy
- Highly accurate AI transcriptions in over 100 languages with .TXT and .SRT file formats
- High-quality studio recordings, locally recorded on each participant’s device
- Separate audio and video tracks for each participant to give you more editing flexibility
- Automatic multi-track sync to ensure all tracks remain aligned
- Easy to customize your recordings with your own logos and background
- Multi-layout Magic clip creator to make short-form videos for TikTok, Instagram Stories, YouTube Shorts, LinkedIn, and more
- Automated tools for background noise removal and echo cancellation

Clipchamp
.webp)
Price: free to begin with paid plans starting at $11.99 per month
Compatibility: Clipchamp is available for Windows, macOS, and Linux users
Clipchamp is a software for trimming videos and making other edits. While Clipchamp doesn’t have a text-based editor, you can use it to trim and cut by editing the timeline of your video. You can also use it to split and combine shorter videos, crop and resize, use filters and transitions, and add images.
Features:
- Customizable video templates for platforms like YouTube and Instagram
- Add AI voiceover in 70 different languages
- Balance colors manually and add backgrounds
Movavi

Price: 7 day trial period with plans starting at $37.95 per year or $47.95 for a lifetime license
Compatibility: Available on both Mac and Windows PCs
Movavi Video Suite and Video Editor is a paid tool for editing videos. You can use Movavi to easily add different filters to your video, as well as many other effects like stickers, titles, and transitions. There are also tools like stabilization, color correction, and motion tracking.
Features:
- AI noise removal, background removal, and upscaling
- Movavi has a library with free music and sounds
- Directly upload to TikTok
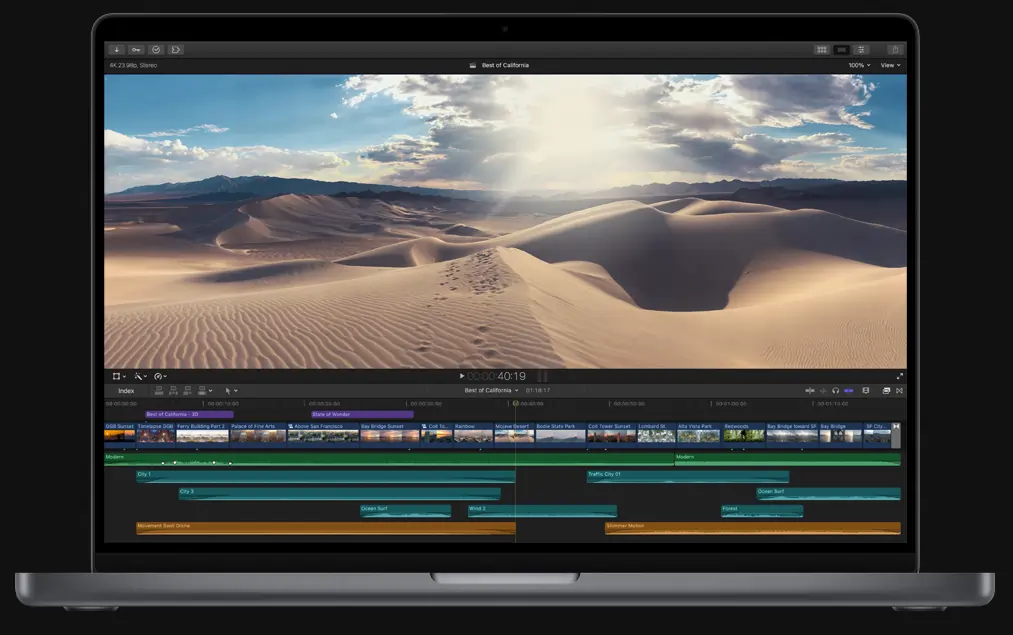
Final Cut Pro
Price: free trial for 90 days and then $299.99 for full license
Compatibility: Mac computers only
Final Cut Pro is a professional-level editing suite with advanced video trimming features. While this software may not be the best choice for beginners, it does give you advanced editing options. It can also work with complex projects with larger frame sizes and frame rates. Though there is no option for text-based editing with a transcription.
Features:
- Motion graphics features include 2D and 3D titles, filters, and green screen effects
- Multicam editing lets you sync up to 64 angles of video
- Adjust video color settings including hue, saturation, and brightness
FAQs on How to Trim a Video
Want to learn more about trimming and editing videos? Check out the below frequently asked questions (FAQs):
How can I trim parts of a video?
You can easily trim parts of a video on your device or computer using built-in apps as well as third-party editing software. On a Windows PC computer, you can use the Photos app to trim parts of a video. Use iMovie to trim video on Mac or iOS devices. Android devices also have the Google Gallery app for easy video edits.
Mentioned above are other options for editing software, including Riverside, Clipchamp, and Movavi.
How do I edit and trim a video?
You can edit and trim a video with many different software and app options. For most software, you will need to import your video into the program. Then the majority of editing tools will have a timeline showing your video, which you can navigate to watch. Drag the start and end points of a video to easily trim it.
With Riverside, editing and trimming a video is much easier. Our new text-based editor means trimming your content is as easy as deleting parts of the transcript.
How do I cut a video shorter?
To cut a video shorter you can use a pre-installed app on your phone or computer or use a different editing software. Generally, you must follow the steps below to cut a video shorter:
- Choose your video editing software
- Import the video you’d like to edit into the software
- View the video to find the point you’d like to cut
- Trim the video by dragging the start and end points to where you want. Or use a ‘Cut’ or ‘Split’ tool to cut the video into smaller portions and then delete the unwanted section.
- Replay your edited video to make sure the correct part was edited
- Save or export your trimmed video
Want a simpler option? Try out Riverside’s new text-based editor which makes trimming a video as easy as deleting text in the transcription. You can also easily navigate the video by searching by word or keyphrase to quickly make changes.


.webp)
.webp)
.webp)
 (1).webp)
.webp)
.webp)